
Spring boot makes application development easier but we may face some tough interview questions when it comes to test your knowledge on how it all works. Be prepare for the next job interview with given Spring boot interview questions with answers.
Table of Contents

1. What is Spring boot? How it is different from Spring framework?
2. Advantages and disadvantages of spring boot?
3. What is auto-configuraion? How to enable or disable certain configuration?
4. What are starter dependencies?
5. Spring boot common annotations?
6. Embedded server support in Spring boot?
7. Why we use spring boot maven plugin?
8. How to create and bootstrap a simple boot application?
10. How to enable debug logging?
11. What is Spring Actuator? What are its advantages?
12. What is relaxed binding in Spring boot?
13. How to unit test and intration test a spring boot application?
14. How to enable hot deployment and live reload on browser?
15. How to enable HTTPS/SSL support in Spring boot?
1. What is Spring boot? How it is different from Spring framework?
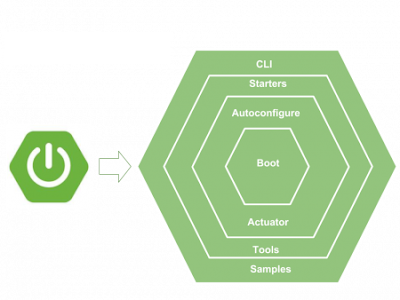
Spring Boot is a spring framework module which provides RAD (Rapid Application Development) feature to the Spring framework with help of starter templates and auto-configuration features which are very powerful and work flawlessly.
It takes an opinionated view of the Spring platform and third-party libraries. It means that as soon as we include any dependency into application, spring boot assumes its general purpose and automatically configures the most used classes in library as spring beans with sensible defaults.
For example, if we are creating a web MVC application then including maven dependency spring-boot-starter-web only brings all jars/libraries used for building web, including RESTful, applications using Spring webMVC. Ut also includes Tomcat as the default embedded container.
It also provides a range of non-functional features such as embedded servers, security, metrics, health checks, and externalized configuration out of the box without extra configurations.
If we have to identify the difference between Spring framework and Spring boot, then we can say that Spring Boot is basically an extension of the Spring framework which eliminated the boilerplate configurations required for setting up a working production ready application.
It takes an opinionated view of the Spring and third party libraries imported into project and configure the behavior for us. The difference is as simple as it.
2. Advantages and disadvantages of spring boot?
The two best advantages of boot is simplified & version conflict free dependency management through the starter POMs and opinionated auto-configuration of most commonly used libraries and behaviors.
The embedded jars enables to package the web applications as jar file which can be run anywhere.
It’s actuator module provides HTTP endpoints to access application internals like detailed metrics, application inner working, health status, etc.
On disadvantages side, they are very few. Still many developers may see the transitive dependencies included with starter poms as burden to deployment packaging.
Also, it’s auto-configuration feature may enable many such features which we may never use in application lifecycle and they will sit there all the time initialized and fully configured. It may cause some un-necessary resource utilization.
3. What is auto-configuration? How to enable or disable certain configuration?
Spring boot auto configuration scans the classpath, finds the libraries in the classpath and then attempt to guess the best configuration for them, and finally configure all such beans.
Auto-configuration tries to be as intelligent as possible and will back-away as we define more of our own custom configuration. It is always applied after user-defined beans have been registered.
Auto-configuration works with help of @Conditional annotations such as @ConditionalOnBean and @ConditionalOnClass.
For example, look at AopAutoConfiguration class. If class path scanning finds EnableAspectJAutoProxy, Aspect, Advice and AnnotatedElement classes and spring.aop.auto=false is not present in properties file then Spring boot will configure the Spring AOP module for us.
@Configuration@ConditionalOnClass({ EnableAspectJAutoProxy.class, Aspect.class, Advice.class, AnnotatedElement.class })@ConditionalOnProperty(prefix = "spring.aop", name = "auto", havingValue = "true", matchIfMissing = true)public class AopAutoConfiguration { //code} |
4. What are starter dependencies?
Spring Boot starters are maven templates that contain a collection of all the relevant transitive dependencies that are needed to start a particular functionality.
For example, If we want to create a Spring WebMVC application then in a traditional setup, we would have included all required dependencies ourselves. It leaves the chances of version conflict which ultimately result in more runtime exceptions.
With Spring boot, to create web MVC application, all we need to import is spring-boot-starter-web dependency. Transitively, it brings in all other required dependencies to build a web application e.g. spring-webmvc, spring-web, hibernate-validator, tomcat-embed-core, tomcat-embed-el, tomcat-embed-websocket, jackson-databind, jackson-datatype-jdk8, jackson-datatype-jsr310 and jackson-module-parameter-names.
<dependency> <groupId>org.springframework.boot</groupId> <artifactId>spring-boot-starter-web</artifactId></dependency> |
5. Spring boot common annotations?
The most commonly used and important spring boot annotations are as below:
@EnableAutoConfiguration– It enable auto-configuration mechanism.@ComponentScan– enable component scanning in application classpath.@SpringBootApplication– enable all 3 above three things in one step i.e. enable auto-configuration mechanism, enable component scanning and register extra beans in the context.- @ImportAutoConfiguration
@AutoConfigureBefore, @AutoConfigureAfter, @AutoConfigureOrder– shall be used if the configuration needs to be applied in a specific order (before of after).@Conditional– annotations such as @ConditionalOnBean, @ConditionalOnWebApplication or @ConditionalOnClass allow to register a bean only when the condition meets.
– imports and apply only the specified auto-configuration classes. We should use this when we don’t want to enable the default auto-configuration.
6. Embedded server support in Spring boot?
Spring boot applications always include tomcat as embedded server dependency. It means you can run the Spring boot applications from the command prompt without needling complex server infrastructure.
If we want then we can exclude tomcat and include any other embedded server if we want. Or we can make exclude server environment altogether. It’s all configuration based.
For example, below configuration exclude tomcat and include jetty as embedded server.
<dependency> <groupId>org.springframework.boot</groupId> <artifactId>spring-boot-starter-web</artifactId> <exclusions> <exclusion> <groupId>org.springframework.boot</groupId> <artifactId>spring-boot-starter-tomcat</artifactId> </exclusion> </exclusions></dependency> <dependency> <groupId>org.springframework.boot</groupId> <artifactId>spring-boot-starter-jetty</artifactId></dependency> |
7. Why we use spring boot maven plugin?
It provides Spring Boot support in Maven, letting us package executable jar or war archives and run an application “in-place”. To use it, we must use Maven 3.2 (or later).
The plugin provides several goals to work with a Spring Boot application:
spring-boot:repackage: create a jar or war file that is auto-executable. It can replace the regular artifact or can be attached to the build lifecycle with a separate classifier.spring-boot:run: run your Spring Boot application with several options to pass parameters to it.spring-boot:startandstop: integrate your Spring Boot application to theintegration-testphase so that the application starts before it.spring-boot:build-info: generate a build information that can be used by the Actuator.
8. How to create and bootstrap a simple boot application?
- To create any simple spring boot application, we need to start by creating a
pom.xmlfile. Addspring-boot-starter-parentas parent of the project which makes it a spring boot application.pom.xml <?xmlversion="1.0"encoding="UTF-8"?><projectxmlns="http://maven.apache.org/POM/4.0.0"xmlns:xsi="http://www.w3.org/2001/XMLSchema-instance"xsi:schemaLocation="http://maven.apache.org/POM/4.0.0 https://maven.apache.org/xsd/maven-4.0.0.xsd"><modelVersion>4.0.0</modelVersion><groupId>com.example</groupId><artifactId>myproject</artifactId><version>0.0.1-SNAPSHOT</version><parent><groupId>org.springframework.boot</groupId><artifactId>spring-boot-starter-parent</artifactId><version>2.2.1.RELEASE</version></parent></project>Above is simplest spring boot application which can be packaged as jar file. Now import the project in your IDE (optional).
- Now we can start adding other starter dependencies that we are likely to need when developing a specific type of application. For example, for a web application, we add a spring-boot-starter-web dependency.
pom.xml <dependencies><dependency><groupId>org.springframework.boot</groupId><artifactId>spring-boot-starter-web</artifactId></dependency></dependencies> - Start adding application business logic, views and domain data at this step. By default, Maven compiles sources from
src/main/javaso create your application code inside this folder only.As the very initial package, add the application bootstrap class and add
@SpringBootApplicationannotation. This class will be used to run the application. It’smain()method acts as the application entry point.MyApplication.java importorg.springframework.boot.SpringApplication;importorg.springframework.boot.autoconfigure.SpringBootApplication;@SpringBootApplicationpublicclassMyApplication{publicstaticvoidmain(String[] args) {SpringApplication.run(MyApplication.class, args);}} - The SpringApplication class provided in above
main()method bootstraps our application, starting Spring, which, in turn, starts the auto-configured Tomcat web server.MyApplication(method argument) indicates the primary Spring component. - Since we used the spring-boot-starter-parent POM, we have a useful “run” goal that we can use to start the application. Type
'mvn spring-boot:run'from the root project directory to start the application.It will start the application which we can verify in console logs as well as in browser by hitting URL:
localhost:8080.
9. How to package a web application as executable jar or war file?
Executable jars (sometimes called “fat jars”) are archives containing the compiled classes along with all of the jar dependencies that the application needs to run.
To create an executable jar, we shall add spring-boot-maven-plugin in pom.xml. By default, this plugin package the application as .jar file only.
<build> <plugins> <plugin> <groupId>org.springframework.boot</groupId> <artifactId>spring-boot-maven-plugin</artifactId> </plugin> </plugins></build> |
To create war file, first logical step is to declare the packaging type ‘war’ in pom.xml file.
Second thing, set scope of embedded server dependency to ‘provided’ because server dependencies will be provided by application server where war file will be deployed.
<packaging>war</packaging><dependency> <groupId>org.springframework.boot</groupId> <artifactId>spring-boot-starter-tomcat</artifactId> <scope>provided</scope></dependency> |
10. How to enable debug logging?
To enable debug logging,
- we can start the application with the
--debugswitch. - we can set the
logging.level.root=debugproperty inapplication.propertiesfile. - We can set the logging level of root logger in supplied logging configuration file.
11. What is Spring Actuator? What are its advantages?
Spring boot’s actuator module allows us to monitor and manage application usages in production environment, without coding and configuration for any of them. These monitoring and management information is exposed via REST like endpoint URLs.
The simplest way to enable the features is to add a dependency to the spring-boot-starter-actuator starter pom file.
<dependency> <groupId>org.springframework.boot</groupId> <artifactId>spring-boot-starter-actuator</artifactId></dependency> |
Spring Boot includes a number of built-in endpoints and lets we add our own. Further, each individual endpoint can be enabled or disabled as well.
Some of important and widely used actuator endpoints are given below:
Endpoint | Usage |
|---|---|
/env | Returns list of properties in current environment |
/health | Returns application health information. |
/auditevents | Returns all auto-configuration candidates and the reason why they ‘were’ or ‘were not’ applied. |
/beans | Returns a complete list of all the Spring beans in your application. |
/trace | Returns trace logs (by default the last 100 HTTP requests). |
/dump | It performs a thread dump. |
/metrics | It shows several useful metrics information like JVM memory used, system CPU usage, open files, and much more. |
12. What is relaxed binding in Spring boot?
Spring Boot uses some relaxed rules for resolving configuration properties name such that a simple property name can be written in multiple ways.
For example, a simple property “log.level.my-package” can be written in following ways and all are correct and will be resolved by framework for it’s value based on property source.
log.level.my-package = debug //Kebab caselog.level.my_package = debug //Underscore notationlog.level.myPackage = debug //Camel caseLOG.LEVEL.MY-PACKAGE = debug //Upper case format |
Following is list of the relaxed binding rules per property source.
Property Source | Types Allowed |
|---|---|
Properties Files | Camel case, kebab case, or underscore notation |
YAML Files | Camel case, kebab case, or underscore notation |
Environment Variables | Upper case format with underscore as the delimiter. _ should not be used within a property name |
System properties | Camel case, kebab case, or underscore notation |
13. How to do unit testing and integration testing in a spring boot application?
Typically any software application is divided into different modules and components. When one such component is tested in isolation, it is called unit testing.
Unit tests do not verify whether the application code works with external dependencies correctly. It focuses on single component and mocks all dependencies this component interacts with.
To perform unit testing, we can take help of specialized annotations such as :
@JdbcTest– can be used for a typical jdbc test when a test focuses only on jdbc-based components.@JsonTest– It is used when a test focuses only on JSON serialization.@RestClientTest– is used to test REST clients.@WebMvcTest– used for Spring MVC tests with configuration relevant to only MVC tests.
Integration tests can put whole application in scope or only certain components – based on what is being tested. They may need to require resources like database instances and hardware to be allocated for them. Though these interactions can be mocked out as well to improve the test performance.
In integration testing, we shall focus on testing complete request processing from controller to persistence layer.
The @SpringBootTest annotation helps in writing integration tests. It starts the embedded server and fully initializes the application context. We can inject the dependencies in test class using @Autowired annotation.
We can also provide test specific beans configuration using nested @Configuration class or explicit @TestConfiguration classes.
It also registers a TestRestTemplate and/or WebTestClient bean for use in web tests.
@SpringBootTest(classes = SpringBootDemoApplication.class, webEnvironment = WebEnvironment.RANDOM_PORT)public class EmployeeControllerIntegrationTests { @LocalServerPort private int port; @Autowired private TestRestTemplate restTemplate; //tests} |
14. How to enable hot deployment and live reload on browser?
Most modern IDEs support hot swapping of bytecode and most code changes should reload cleanly with no side effects. Additionally, the spring-boot-devtools module includes support for automatic application restarts whenever files on the classpath change.
By default, any entry on the classpath that points to a folder is monitored for changes. Note that certain resources, such as static assets and view templates, do not need to restart the application.
The spring-boot-devtools module includes an embedded LiveReload server that can be used to trigger a browser refresh when a resource is changed. LiveReload browser extensions are freely available for Chrome, Firefox and Safari from livereload.com.
To enable/disable LiveReload server, change value of spring.devtools.livereload.enabled property to true (default value) or false.
15. How to enable HTTPS/SSL support in Spring boot?
The SSL support in spring boot project can be added via application.properties and by adding the below entries.
server.port=8443server.ssl.key-alias=selfsigned_localhost_sslserverserver.ssl.key-password=changeitserver.ssl.key-store=classpath:ssl-server.jksserver.ssl.key-store-provider=SUNserver.ssl.key-store-type=JKS |
Please share with us any more spring boot interview questions, you have encountered in past.


No comments:
Post a Comment
Note: only a member of this blog may post a comment.