W3Schools Learner's Blog

W3Schools Programming knowledge summary website

div

12/23/2017

Spring MVC Beginner Tutorial

Spring MVC Beginner Tutorial At W3schools Learner's Blog
Spring MVC tutorial provides an elegant solution to use MVC in spring framework by the help of DispatcherServlet.
In Spring Web MVC, DispatcherServlet class works as the front controller. It is responsible to manage the flow of the spring mvc application.
The @Controller annotation is used to mark the class as the controller in Spring 3.
The @RequestMapping annotation is used to map the request url. It is applied on the method.

Understanding the flow of Spring Web MVC

Spring MVC example
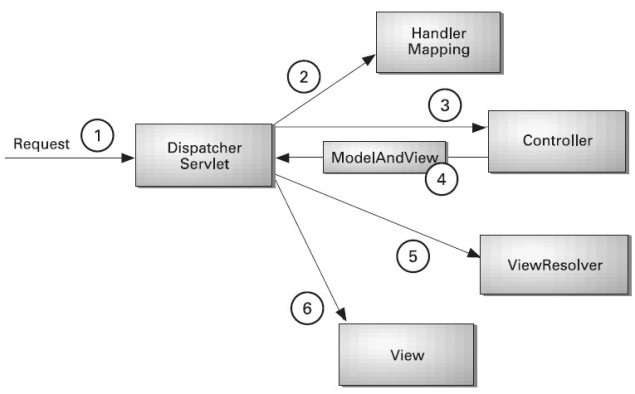
As displayed in the figure, all the incoming request is intercepted by the DispatcherServlet that works as the front controller. The DispatcherServlet gets entry of handler mapping from the xml file and forwards the request to the controller. The controller returns an object of ModelAndView. The DispatcherServlet checks the entry of view resolver in the xml file and invokes the specified view component.

Spring MVC Framework Example

Let's see the simple example of spring web MVC framework. There are given 7 steps for creating the spring MVC application. The steps are as follows:
  1. Create the request page (optional)
  2. Create the controller class
  3. Provide the entry of controller in the web.xml file
  4. Define the bean in the xml file
  5. Display the message in the JSP page
  6. Load the spring core and mvc jar files
  7. Start server and deploy the project

Spring MVC Directory Structure


Directory Structure of Spring MVC using Maven


Required Jar files or Maven Dependency

To run this example, you need to load:
  • Spring Core jar files
  • Spring Web jar files
If you are using Maven, you don't need to add jar files. Now, you need to add maven dependency in pom.xml file.
pom.xml
  1. <project xmlns="http://maven.apache.org/POM/4.0.0" xmlns:xsi="http://www.w3.org/2001/XMLSchema-instance"  
  2.   xsi:schemaLocation="http://maven.apache.org/POM/4.0.0 http://maven.apache.org/maven-v4_0_0.xsd">  
  3.   <modelVersion>4.0.0</modelVersion>  
  4.   <groupId>com.javatpoint</groupId>  
  5.   <artifactId>SpringMVC</artifactId>  
  6.   <packaging>war</packaging>  
  7.   <version>0.0.1-SNAPSHOT</version>  
  8.   <name>SpringMVC Maven Webapp</name>  
  9.   <url>http://maven.apache.org</url>  
  10.   <dependencies>  
  11.       
  12. <dependency>  
  13.       <groupId>junit</groupId>  
  14.       <artifactId>junit</artifactId>  
  15.       <version>3.8.1</version>  
  16.       <scope>test</scope>  
  17. </dependency>  
  18. <dependency>  
  19.     <groupId>javax.servlet</groupId>  
  20.     <artifactId>servlet-api</artifactId>  
  21.     <version>3.0-alpha-1</version>  
  22. </dependency>  
  23. <dependency>  
  24.     <groupId>org.springframework</groupId>  
  25.     <artifactId>spring-core</artifactId>  
  26.     <version>3.1.2.RELEASE</version>  
  27. </dependency>  
  28. <dependency>  
  29.     <groupId>org.springframework</groupId>  
  30.     <artifactId>spring-context</artifactId>  
  31.     <version>3.1.2.RELEASE</version>  
  32. </dependency>  
  33. <dependency>  
  34.     <groupId>org.springframework</groupId>  
  35.     <artifactId>spring-beans</artifactId>  
  36.     <version>3.1.2.RELEASE</version>  
  37. </dependency>  
  38. <dependency>  
  39.     <groupId>org.springframework</groupId>  
  40.     <artifactId>spring-webmvc</artifactId>  
  41.     <version>3.1.2.RELEASE</version>  
  42. </dependency>  
  43.   
  44. </dependencies>  
  45.   <build>  
  46.     <finalName>SpringMVC</finalName>  
  47.   </build>  
  48. </project>  


1) Create the request page (optional)

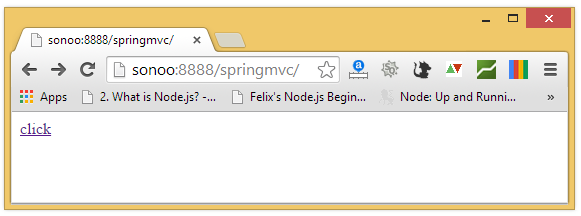
This is the simple jsp page containing a link. It is optional page. You may direct invoke the action class instead.
index.jsp
  1. <a href="hello.html">click</a>  

2) Create the controller class

To create the controller class, we are using two annotations @Controller and @RequestMapping.
The @Controller annotation marks this class as Controller.
The @Requestmapping annotation is used to map the class with the specified name.
This class returns the instance of ModelAndView controller with the mapped name, message name and message value. The message value will be displayed in the jsp page.
HelloWorldController.java
  1. package com.javatpoint;  
  2. import org.springframework.stereotype.Controller;  
  3. import org.springframework.web.bind.annotation.RequestMapping;  
  4. import org.springframework.web.servlet.ModelAndView;  
  5. @Controller  
  6. public class HelloWorldController {  
  7.     @RequestMapping("/hello")  
  8.     public ModelAndView helloWorld() {  
  9.         String message = "HELLO SPRING MVC HOW R U";  
  10.         return new ModelAndView("hellopage""message", message);  
  11.     }  
  12. }  

3) Provide the entry of controller in the web.xml file

In this xml file, we are specifying the servlet class DispatcherServlet that acts as the front controller in Spring Web MVC. All the incoming request for the html file will be forwarded to the DispatcherServlet.
web.xml
  1. <?xml version="1.0" encoding="UTF-8"?>  
  2. <web-app version="2.5"   
  3.     xmlns="http://java.sun.com/xml/ns/javaee"   
  4.     xmlns:xsi="http://www.w3.org/2001/XMLSchema-instance"   
  5.     xsi:schemaLocation="http://java.sun.com/xml/ns/javaee   
  6.     http://java.sun.com/xml/ns/javaee/web-app_2_5.xsd">  
  7.  <servlet>  
  8.     <servlet-name>spring</servlet-name>  
  9.     <servlet-class>org.springframework.web.servlet.DispatcherServlet</servlet-class>  
  10.     <load-on-startup>1</load-on-startup>  
  11. </servlet>  
  12. <servlet-mapping>  
  13.     <servlet-name>spring</servlet-name>  
  14.     <url-pattern>*.html</url-pattern>  
  15. </servlet-mapping>  
  16. </web-app>  

4) Define the bean in the xml file

This is the important configuration file where we need to specify the ViewResolver and View components.
The context:component-scan element defines the base-package where DispatcherServlet will search the controller class.
Here, the InternalResourceViewResolver class is used for the ViewResolver.
The prefix+string returned by controller+suffix page will be invoked for the view component.
This xml file should be located inside the WEB-INF directory.
spring-servlet.xml
  1. <?xml version="1.0" encoding="UTF-8"?>  
  2. <beans xmlns="http://www.springframework.org/schema/beans"  
  3.     xmlns:xsi="http://www.w3.org/2001/XMLSchema-instance"  
  4.     xmlns:p="http://www.springframework.org/schema/p"  
  5.     xmlns:context="http://www.springframework.org/schema/context"  
  6.     xsi:schemaLocation="http://www.springframework.org/schema/beans  
  7. http://www.springframework.org/schema/beans/spring-beans-3.0.xsd  
  8. http://www.springframework.org/schema/context  
  9. http://www.springframework.org/schema/context/spring-context-3.0.xsd">  
  10.     <context:component-scan  base-package="com.javatpoint" />  
  11.     <bean class="org.springframework.web.servlet.view.InternalResourceViewResolver">  
  12.         <property name="prefix" value="/WEB-INF/jsp/" />  
  13.         <property name="suffix" value=".jsp" />  
  14.     </bean>  
  15. </beans>  

5) Display the message in the JSP page

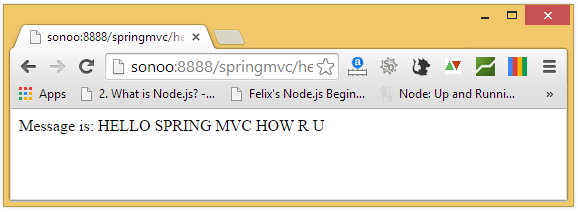
This is the simple JSP page, displaying the message returned by the Controller.
It must be located inside the WEB-INF/jsp directory for this example only.
hellopage.jsp
  1. Message is: ${message}  

Output

spring mvc output1 spring mvc output2

1 comment:

Note: only a member of this blog may post a comment.